LXC lands unified cgroup hierarchy support

containers

I’m excited to announce that we’ve recently added support the new unified cgroup hierarchy (or cgroup v2, cgroup2) to LXC. This includes running system containers that know about the unified cgroup hierarchy and – of course –
application containers that mostly won’t really care about the cgroup layout.
I’m not going to do a deep dive into the differences between legacy cgroup hierarchies and the unified cgroup hierarchy here. But if you’re interested you can watch my talk at last year’s Container Camp Sydney

Here be dragons: some of what I say is likely invalid by now or I’ve come up with simpler solutions.

Currently existing cgroup layouts

But let’s take a quick look at the different cgroup layouts out there. Currently, there are three known cgroup layouts that a container runtime should handle:

1. Legacy cgroup hierarchies

This means that only legacy cgroup controllers are enabled and mounted into either separate hierarchies or multiple individual cgroup hierarchies. The mount layout of a legacy cgroup hierarchy has been standardized in recent years. This is mainly due to the widespread use of systemd and its opinionated way of how legacy cgroups should be mounted (Note, this is not a critique.). A standard legacy cgroup layout will usually look like this:

├─/sys/fs/cgroup tmpfs tmpfs ro,nosuid,nodev,noexec,mode=755
│ ├─/sys/fs/cgroup/systemd cgroup cgroup rw,nosuid,nodev,noexec,relatime,xattr,name=systemd
│ ├─/sys/fs/cgroup/devices cgroup cgroup rw,nosuid,nodev,noexec,relatime,devices
│ ├─/sys/fs/cgroup/blkio cgroup cgroup rw,nosuid,nodev,noexec,relatime,blkio
│ ├─/sys/fs/cgroup/cpu,cpuacct cgroup cgroup rw,nosuid,nodev,noexec,relatime,cpu,cpuacct
│ ├─/sys/fs/cgroup/cpuset cgroup cgroup rw,nosuid,nodev,noexec,relatime,cpuset,clone_children
│ ├─/sys/fs/cgroup/rdma cgroup cgroup rw,nosuid,nodev,noexec,relatime,rdma
│ ├─/sys/fs/cgroup/hugetlb cgroup cgroup rw,nosuid,nodev,noexec,relatime,hugetlb
│ ├─/sys/fs/cgroup/freezer cgroup cgroup rw,nosuid,nodev,noexec,relatime,freezer
│ ├─/sys/fs/cgroup/net_cls,net_prio cgroup cgroup rw,nosuid,nodev,noexec,relatime,net_cls,net_prio
│ ├─/sys/fs/cgroup/perf_event cgroup cgroup rw,nosuid,nodev,noexec,relatime,perf_event
│ ├─/sys/fs/cgroup/pids cgroup cgroup rw,nosuid,nodev,noexec,relatime,pids
│ └─/sys/fs/cgroup/memory cgroup cgroup rw,nosuid,nodev,noexec,relatime,memory

As you can see, most controllers (e.g. devices, blkio, cpuset) are mounted into a separate cgroup hierarchy. They could be mounted differently but given that this is how most userspace programs now mount cgroups and expect cgroups to be mounted other forms of mounting them rarely need to be supported.

2. Hybrid cgroup hierarchies

The mount layout of hybrid cgroup hierarchies is mostly identical to the mount layout of the legacy cgroup hierarchies. The only difference usually being that the unified cgroup hierarchy is mounted as well. The unified cgroup hierarchy can easily be spotted by looking at the FSTYPE field in the output of the findmnt command. For legacy cgroup hierarchies it will show cgroup as value and for the unified cgroup hierarchy it will show cgroup2 as value. In the output below the third field corresponds to the FSTYPE:

├─/sys/fs/cgroup tmpfs tmpfs ro,nosuid,nodev,noexec,mode=755
│ ├─/sys/fs/cgroup/unified cgroup cgroup2 rw,nosuid,nodev,noexec,relatime
│ ├─/sys/fs/cgroup/systemd cgroup cgroup rw,nosuid,nodev,noexec,relatime,xattr,name=systemd
│ ├─/sys/fs/cgroup/devices cgroup cgroup rw,nosuid,nodev,noexec,relatime,devices
│ ├─/sys/fs/cgroup/blkio cgroup cgroup rw,nosuid,nodev,noexec,relatime,blkio
│ ├─/sys/fs/cgroup/cpu,cpuacct cgroup cgroup rw,nosuid,nodev,noexec,relatime,cpu,cpuacct
│ ├─/sys/fs/cgroup/cpuset cgroup cgroup rw,nosuid,nodev,noexec,relatime,cpuset,clone_children
│ ├─/sys/fs/cgroup/rdma cgroup cgroup rw,nosuid,nodev,noexec,relatime,rdma
│ ├─/sys/fs/cgroup/hugetlb cgroup cgroup rw,nosuid,nodev,noexec,relatime,hugetlb
│ ├─/sys/fs/cgroup/freezer cgroup cgroup rw,nosuid,nodev,noexec,relatime,freezer
│ ├─/sys/fs/cgroup/net_cls,net_prio cgroup cgroup rw,nosuid,nodev,noexec,relatime,net_cls,net_prio
│ ├─/sys/fs/cgroup/perf_event cgroup cgroup rw,nosuid,nodev,noexec,relatime,perf_event
│ ├─/sys/fs/cgroup/pids cgroup cgroup rw,nosuid,nodev,noexec,relatime,pids
│ └─/sys/fs/cgroup/memory cgroup cgroup rw,nosuid,nodev,noexec,relatime,memory

To be honest, this is not my favorite cgroup layout since it could potentially mean that some cgroup controllers are mounted into separate legacy hierarchies while others could be enabled in the unified cgroup hierarchy. That is not difficult but annoying to handle cleanly. However, systemd usually plays nice and only supports the empty unified cgroup hierarchy in hybrid cgroup layouts.

That is to say, all controllers are mounted into legacy cgroup hierarchies and the unified hierarchy is just used by systemd to track processes, essentially replacing the old named systemd legacy cgroup hierarchy.

3. Unified cgroup hierarchy

The last option is to only mount the unified cgroup hierarchy direcly at
/sys/fs/cgroup:

├─/sys/fs/cgroup cgroup cgroup2 rw,nosuid,nodev,noexec,relatime

This will likely be the near future.

LXC in current git master will support all three layouts properly including setting resource limits. So far, LXC has only provided the lxc.cgroup.* namespace to set cgroup settings on legacy cgroup hierarchies. For example, to set a limit on the number of cpus on the cpuset legacy cgroup hierarchy one would simply specify lxc.cgroup.cpuset.cpus = 1-2 in the containers config file. The idea behind this is that the lxc.cgroup.* namespace simply takes the name of a cgroup controller and a file that should be modified.

Similar to the lxc.cgroup.* legacy hierarchy namespace we have now introduced the lxc.cgroup2.* namespace which follows the exact same logic but allows to set cgroup limits on the unified hierarchy. This should allow users to easily and intuitively transition from legacy cgroup layouts to unified cgroup layouts in the near future if their distro of choice decides to do the switch.

One of the first benefactors will be LXD since we have some users running on unified layouts. But of course, the feature is available to all user of the API of the LXC shared library.

CRIU

criu

Most low-level software engineers that have an interest in new technologies will probably already know what this post is about: checkpoint/restore in userspace. But this post is – unlike most posts about this technology – not aimed at low-level software monkeys like me. I would rather like to have people outside of academia and engineering understand what CRIU is and why it is one of the most exciting technologies in recent years.

Imagine having an important program running, I mean a program so important that taking it down is unthinkable. Think about a program that manages your bank account, all your precious, precious finances. It would be a shame if it would go down and all the runtime information associated with that program is now lost.

Runtime information is basically that part of a running program that is very volatile. Meaning, this information is usually lost when the program stops or crashes unexpectedly. Some of this information though can be very vital and important to someone. I’m using this term loosely here. Runtime information in that sense is anything that e.g. has not yet been written to disk. Information that somehow is not yet safe in any way. Think of it as having a very heavily loaded paper bag with all your groceries. You have no choice but to carry it all in this bag but until you set down that bag on your table at home to unpack it this thing could rip at any moment. Runtime information might be information such as the last financial transactions from a big banking deal you just struck. What if you need to evacuate that program because there’s an impending hardware failure or you’re worried that you need to restore it somehow with all the given state this program carries at a specific point in time – all the precious runtime information. There aren’t a lot of ways to achieve this.

The funny thing is that this very simple problem I tried to describe is one that actually a lot of companies have. Take all the replication or saving to disk and backups that you need often this is still not enough. You might still need to touch that program while it is running in a very sensitive way which might cause it to crash and then the runtime information will be lost. You may be able to restore it but think about a heavy program that needs to now reinitialize a database, restore from a bunch of backups and come back to the point of execution it was at before the crash to continue operation. Sure, 5 minutes doesn’t sound like a lot but 5 minutes not serving paycheck information for a couple of big companies and you’d be surprised how fast a seemingly minor annoyance becomes a major crisis.

But what if you could literally snapshot a running program with all its state dump that state to disk and on crash restore that program to the exact point of execution it was before it crashed. You guessed it CRIU allows you to do it. Even better you can live migrate a program while it is running. Think about a machine that is about to fail or has to be taken down. CRIU would let you send that program from one machine to another without stopping it. Think about how crazy ingenious this actually is and what engineering feat. It’s like moving your whole household from somewhere in Europe to Japan without a single thing being changed or lost.

CRIU is a cross-company effort with strong ties to academia and research. I’ve had the pleasure of getting to know a lot of the guys who are developing CRIU not just are they extremely nice and competent, the work they have done is absolutely impressive: from an engineering perspective and from actual potential for real-world impact.
Finally, here’s some more technical insight into CRIU by a friend of mine you might enjoy:

CNI for LXC

This was definitely needed! Thanks.

S3hh's Blog

It’s now possible to use CNI (container networking interface) with lxc. Here is an example. This requires some recent upstream patches, so for simplicity let’s use the lxc packages for zesty in ppa:serge-hallyn/atom. Setup a zesty host with that ppa, i.e.

sudo add-apt-repository ppa:serge-hallyn/atom
sudo add-apt-repository ppa:projectatomic/ppa
sudo apt update
sudo apt -y install lxc1 skopeo skopeo-containers jq

(To run the oci template below, you’ll also need to install git://github.com/openSUSE/umoci. Alternatively, you can use any standard container, the oci template is not strictly needed, just a nice point to make)

Next setup CNI configuration, i.e.

cat >> EOF | sudo tee /etc/lxc/simplebridge.cni
{
  "cniVersion": "0.3.1",
  "name": "simplenet",
  "type": "bridge",
  "bridge": "cnibr0",
  "isDefaultGateway": true,
  "forceAddress": false,
  "ipMasq": true,
  "hairpinMode": true,
  "ipam": {
    "type": "host-local",
    "subnet": "10.10.0.0/16"
  }
}
EOF

The way lxc will use CNI is to call out to it using a start-host hook, that is, a program (hook) which…

View original post 137 more words

Namespaced File Capabilities

S3hh's Blog

Namespaced file capabilities

As of this past week, namespaced file capabilities are available in the upstream kernel. (Thanks to Eric Biederman for many review cycles and for the final pull request)

TL;DR

Some packages install binaries with file capabilities, and fail to install if you cannot set the file capabilities. Such packages could not be installed from inside a user namespace. With this feature, that problem is fixed.

Yay!

What are they?

POSIX capabilities are pieces of root’s privilege which can be individually used.

File capabilites are POSIX capability sets attached to files. When files with associated capabilities are executed, the resulting task may end up with privilege even if the calling user was unprivileged.

What’s the problem

In single-user-namespace days, POSIX capabilities were completely orthogonal to userids. You can be a non-root user with CAP_SYS_ADMIN, for instance. This can happen by starting as root, setting PR_SET_KEEPCAPS through prctl(2), and…

View original post 284 more words

Ceph storage driver in LXD

containers

Even before LXD gained its new powerful storage API that allows LXD to administer multiple storage pools one frequent request was to extend the range of available storage drivers (btrfs, dir, lvm, zfs) to include Ceph. Now we are happy to announce that we fulfilled this request. As of release 2.16 LXD comes with a Ceph storage driver.

The command line experience for Ceph is similar to the other storage drivers. Anyone who has played with the storage API should feel at home right away. Without going into too much detail of the inner workings of Ceph itself there are a few details one should keep in mind. LXD itself is not concerned with administering the Ceph cluster itself. Instead, LXD can be used to create and administer OSD storage pools in an existing Ceph cluster. The OSD storage pool is then used by LXD to create RBD storage volumes for images, containers, and snapshots just with any other storage driver.

Creating OSD storage pools in Ceph clusters

Like any other storage driver the Ceph storage driver is supported through lxd
init
. So creating a ceph storage pool becomes as easy as this:

For more advanced use cases it’s possible to use our lxc storage command line tool to create further OSD storage pools in a Ceph cluster. Users have the ability to fine tune several parameters when doing so. For example, it is possible to specify the Ceph user via the ceph.user.name and the cluster to use via ceph.cluster_name. So say you wanted to create a new OSD storage pool in the cluster my-cluster for a user called my-user. This can be done by using

lxc storage create my-osd ceph ceph.user.name=my-user ceph.cluster_name=my-cluster

In the following asciinema I’m going to use the default admin for ceph.user.name and ceph for ceph.cluster_name just to illustrate the use of these properties when creating a new OSD storage pool. I will also make use of the osd.osd.pool_name property. This is useful to tell LXD that the internal name LXD uses to represent the OSD storage pool to the user is supposed to be different from the name of the OSD storage pool itself. Usually this is useful when either another OSD storage pool of the same name that you would like LXD to use already exists on disk or when LXD uses the name of the OSD storage pool you would like it to have on disk is already in use by LXD. The final property I’m going to specify is ceph.osd.pg_num to specify the number of placement groups that I want the OSD storage pools to use:

asciicast

Creating images, containers, snapshots on a OSD storage pool

Now that we have created two OSD storage pools we are ready to create containers in them. Let’s see if it all goes well.

asciicast

OSD storage pools use the RBD kernel driver to create and administer storage volumes. RBD storage volumes are conceptually similar to LVM logical volumes and ZFS datasets. They share some properties with both. Similiar to logical volumes, RBD storage volumes are block devices. This means the user can determine which filesystem to use for the storage volumes that are created. By default, LXD will use ext4 for all new storage volumes but it is possible to tell LXD to use xfs instead. Let’s create a new storage pool that uses xfs as its default filesystem for all new storage volumes:

asciicast

But as I said RBD also shares features that make it similar to ZFS. For example, RBD supports the concept of clones. Clones are space-efficient storage volumes based on protected snapshots made of other storage volumes. Internally this leads to a more complex storage pool structure but LXD is smart enough to figure out the right dependencies and keeps track of any storage volumes that need to be kept around even if the container has been deleted. The good news is that not just are these clones space efficient they also are super fast. Let’s try to copy an already existing container. LXD will use RBD clones for that:

Summary

By adding the Ceph storage driver to the storage API LXD gains support for distributed storage. This makes LXD even more suitable for use in critical production environments and in using containers at a very large scale. Administration is easy and intuitive through our storage API. I hope that this short introduction has given you a good impression on what the Ceph storage driver is currently capable of. We have more documentation available in our Github repository and are always open to feature requests and happy to lend support. The Ceph storage driver was fun to implement. I hope you have as much fun using it as I had writing it.

Take care
Christian

Storage management in LXD 2.15


containers

For a long time LXD has supported multiple storage drivers. Users could choose between zfs, btrfs, lvm, or plain directory storage pools but they could only ever use a single storage pool. A frequent feature request was to support not just a single storage pool but multiple storage pools. This way users would for example be able to maintain a zfs storage pool backed by an SSD to be used by very I/O intensive containers and another simple directory based storage pool for other containers. Luckily, this is now possible since LXD gained its own storage management API a few versions back.

Creating storage pools

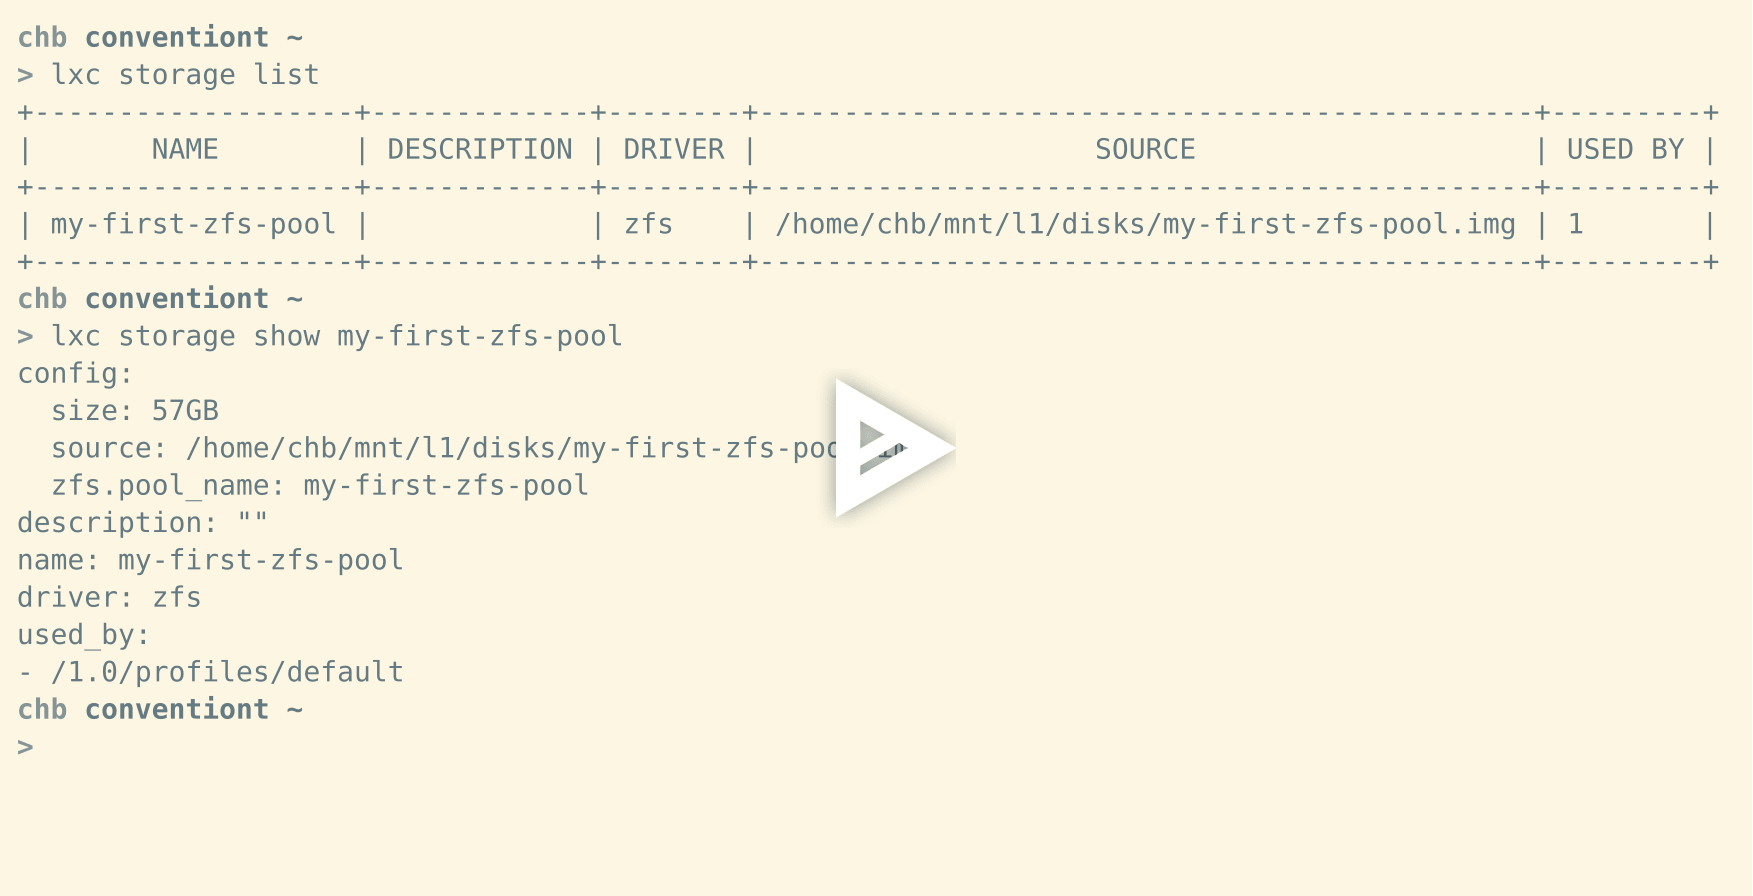
A new LXD installation comes without any storage pool defined. If you run lxd init LXD will offer to create a storage pool for you. The storage pool created by lxd init will be the default storage pool on which containers are created.

asciicast

Creating further storage pools

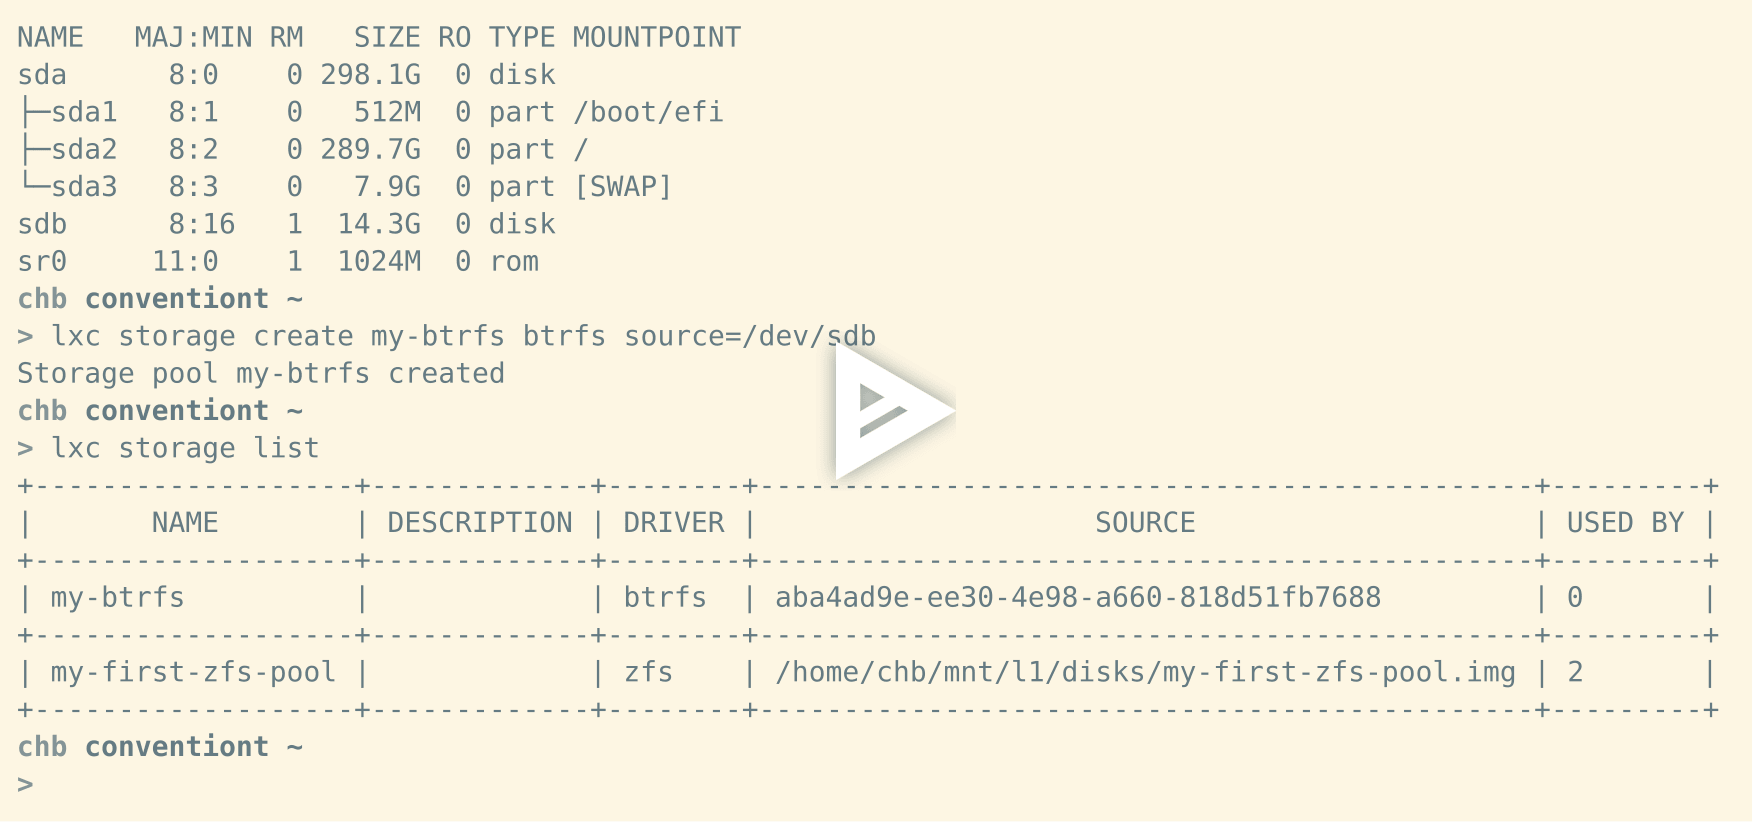
Our client tool makes it really simple to create additional storage pools. In order to create and administer new storage pools you can use the lxc storage command. So if you wanted to create an additional btrfs storage pool on a block device /dev/sdb you would simply use lxc storage create my-btrfs btrfs source=/dev/sdb. But let’s take a look:

asciicast

Creating containers on the default storage pool

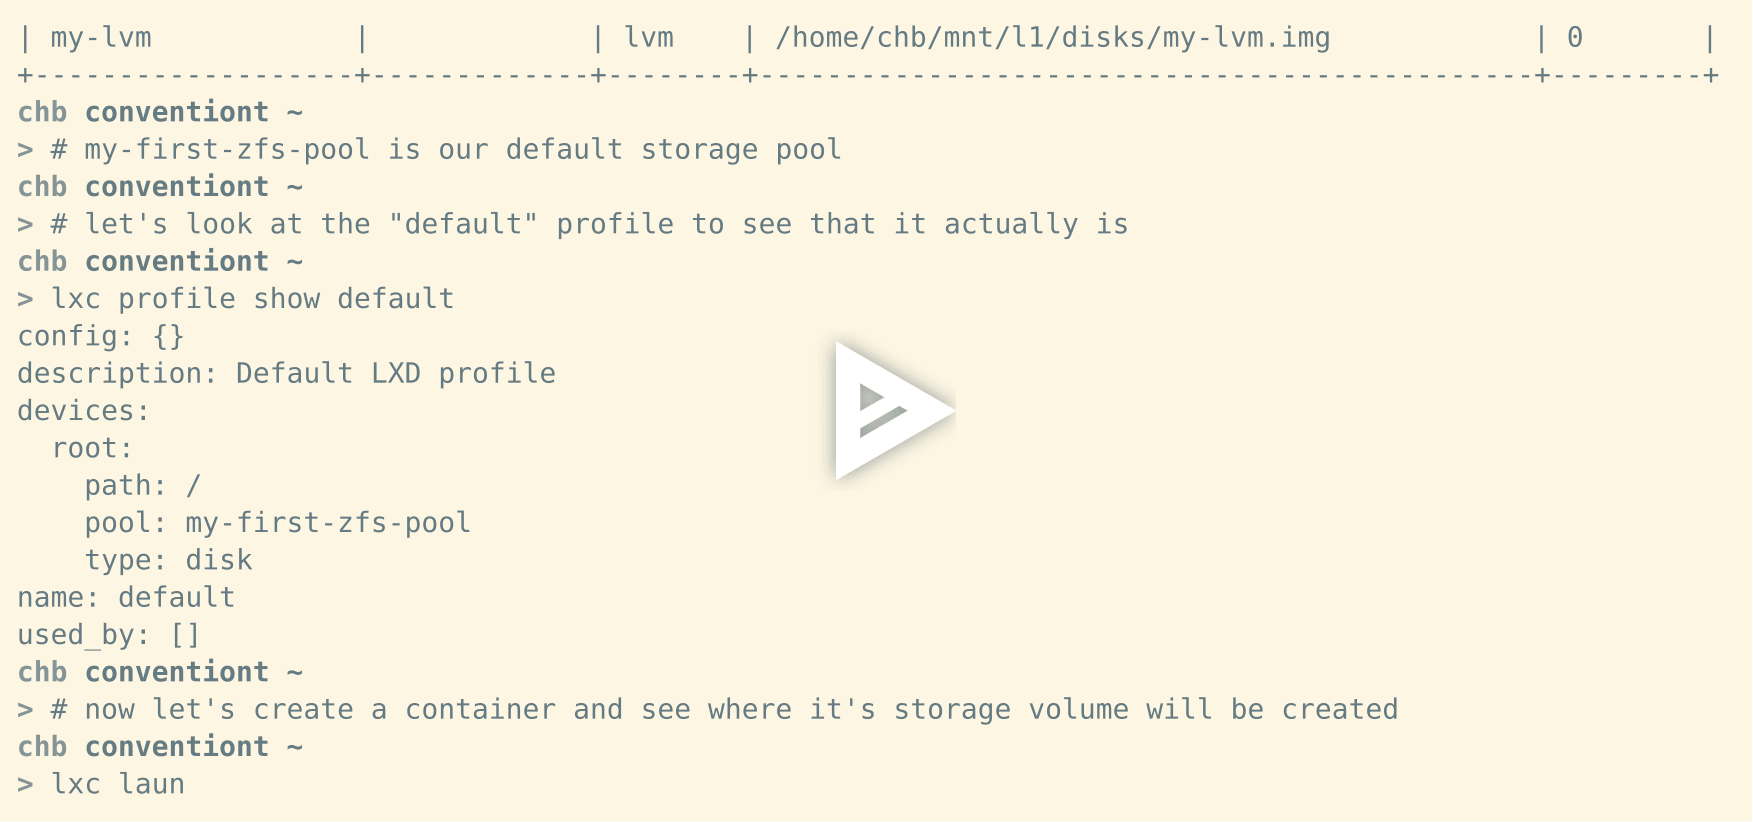
If you started from a fresh install of LXD and created a storage pool via lxd init LXD will use this pool as the default storage pool. That means if you’re doing a lxc launch images:ubuntu/xenial xen1 LXD will create a storage volume for the container’s root filesystem on this storage pool. In our examples we’ve been using my-first-zfs-pool as our default storage pool:

asciicast

Creating containers on a specific storage pool

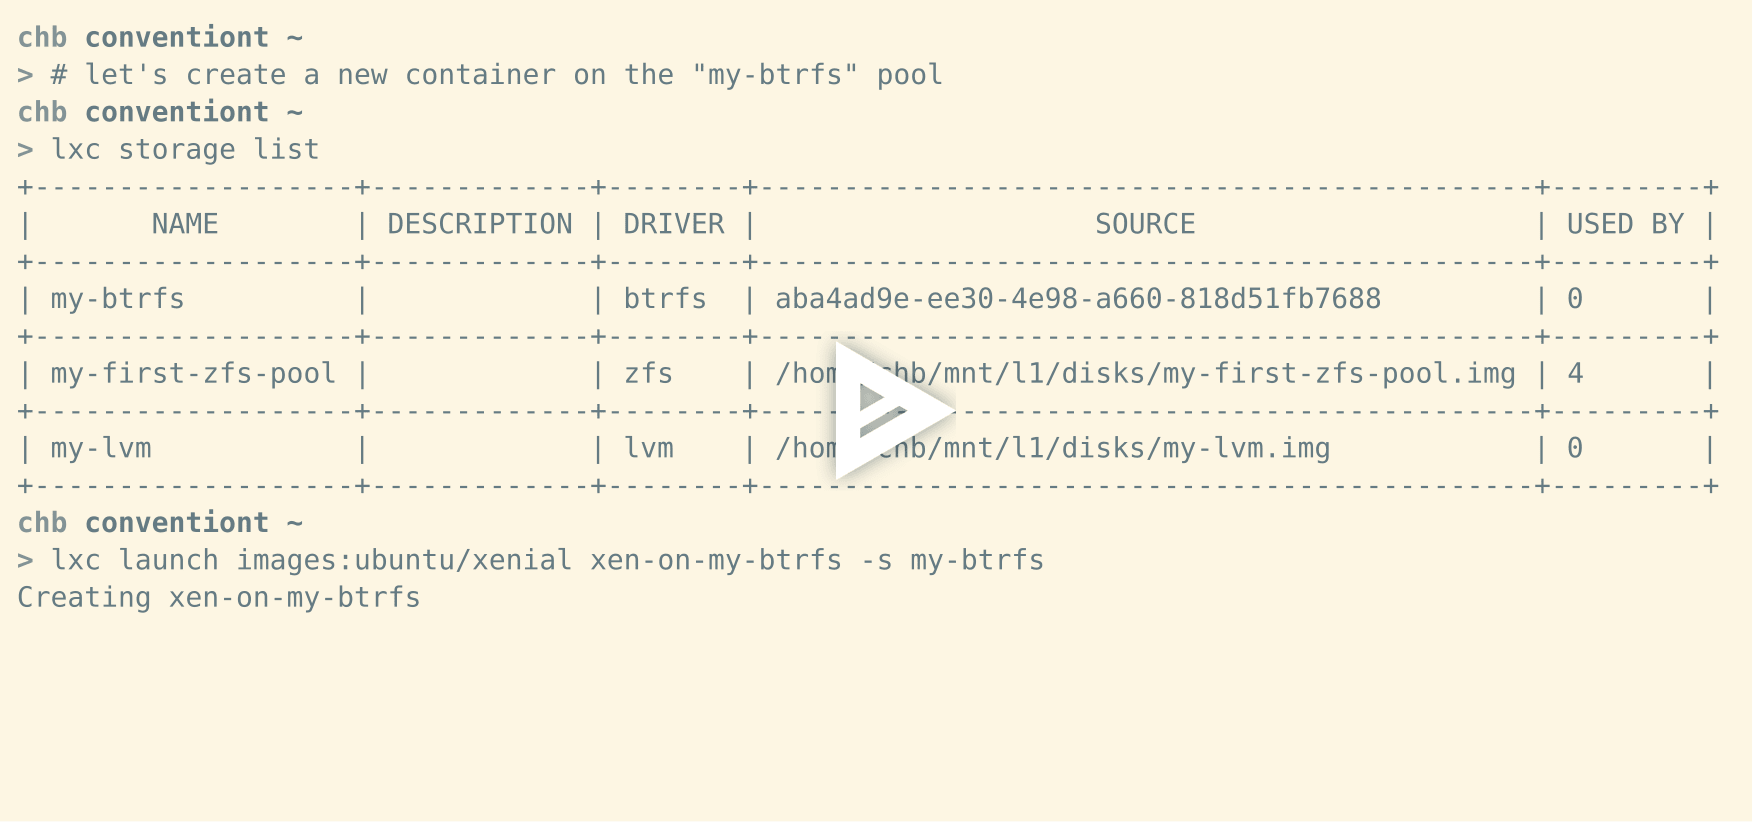
But you can also tell lxc launch and lxc init to create a container on a specific storage pool by simply passing the -s argument. For example, if you wanted to create a new container on the my-btrfs storage pool you would do lxc launch images:ubuntu/xenial xen-on-my-btrfs -s my-btrfs:

asciicast

Creating custom storage volumes

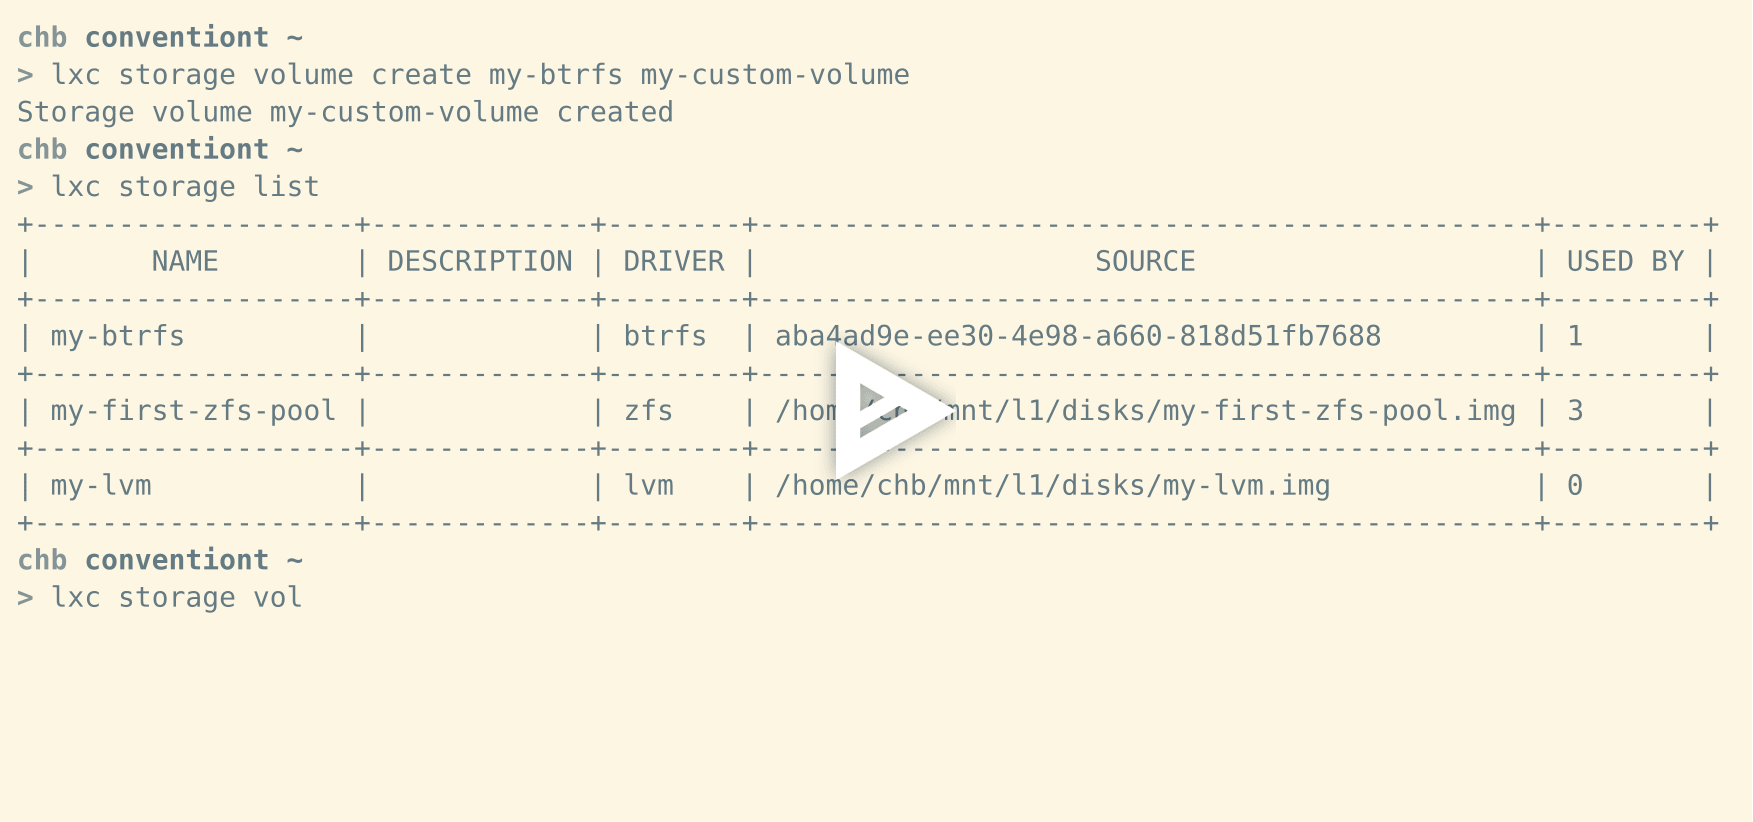
If you need additional space for one of your containers to for example store additional data the new storage API will let you create storage volumes that can be attached to a container. This is as simple as doing lxc storage volume create my-btrfs my-custom-volume:

asciicast

Attaching custom storage volumes to containers

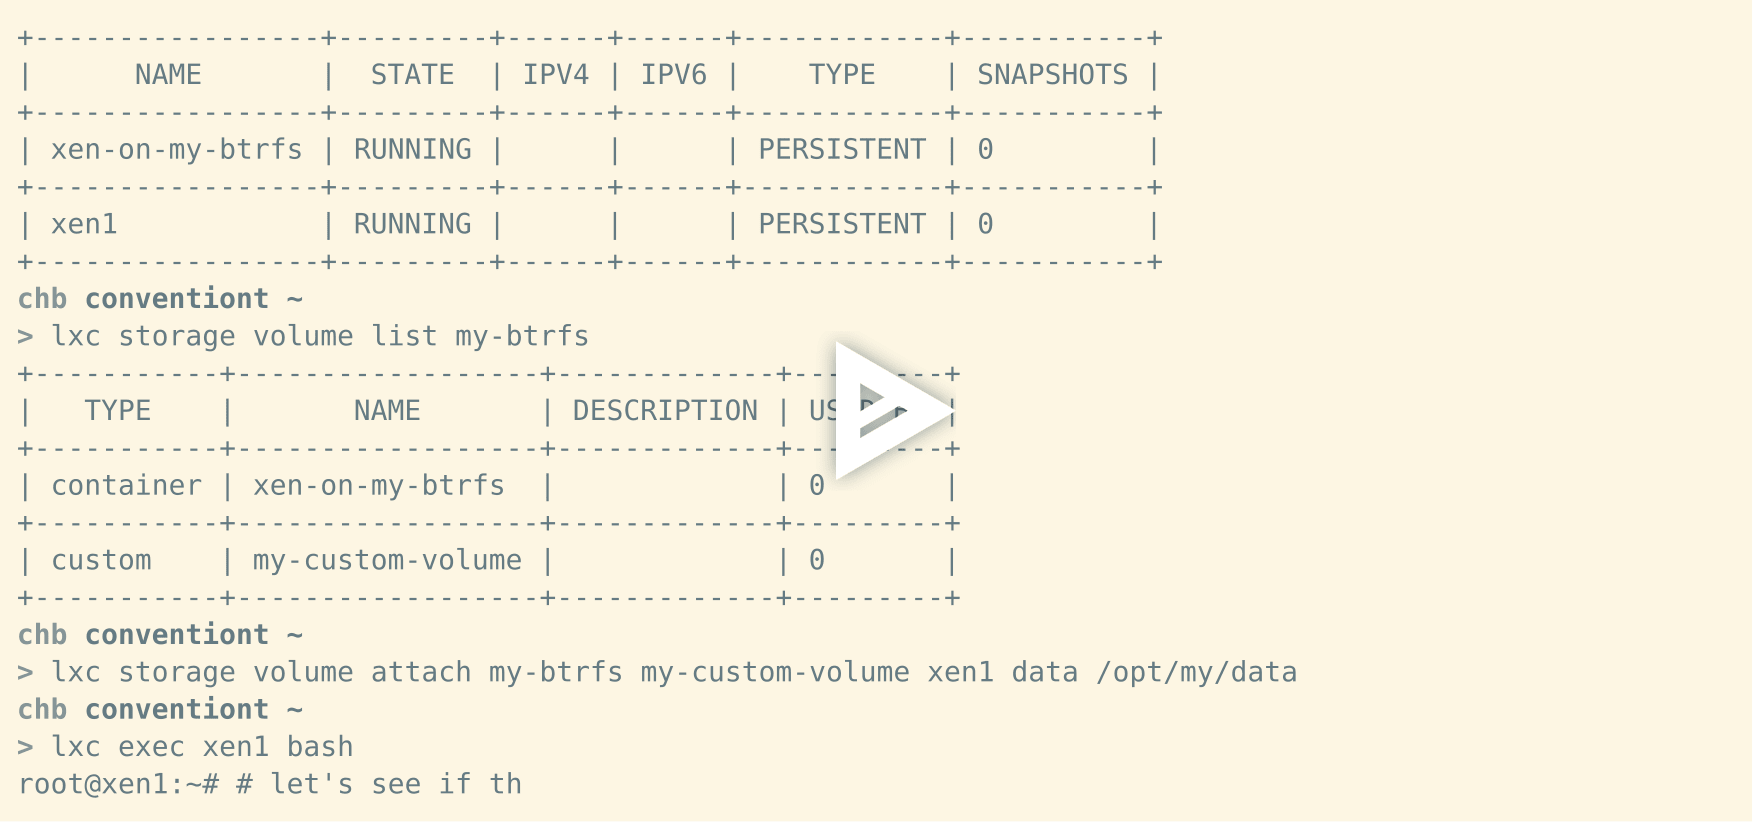
Of course this feature is only helpful because the storage API let’s you attach those storage volume to containers. To attach a storage volume to a container you can use lxc storage volume attach my-btrfs my-custom-volume xen1 data /opt/my/data:

asciicast

Sharing custom storage volumes between containers

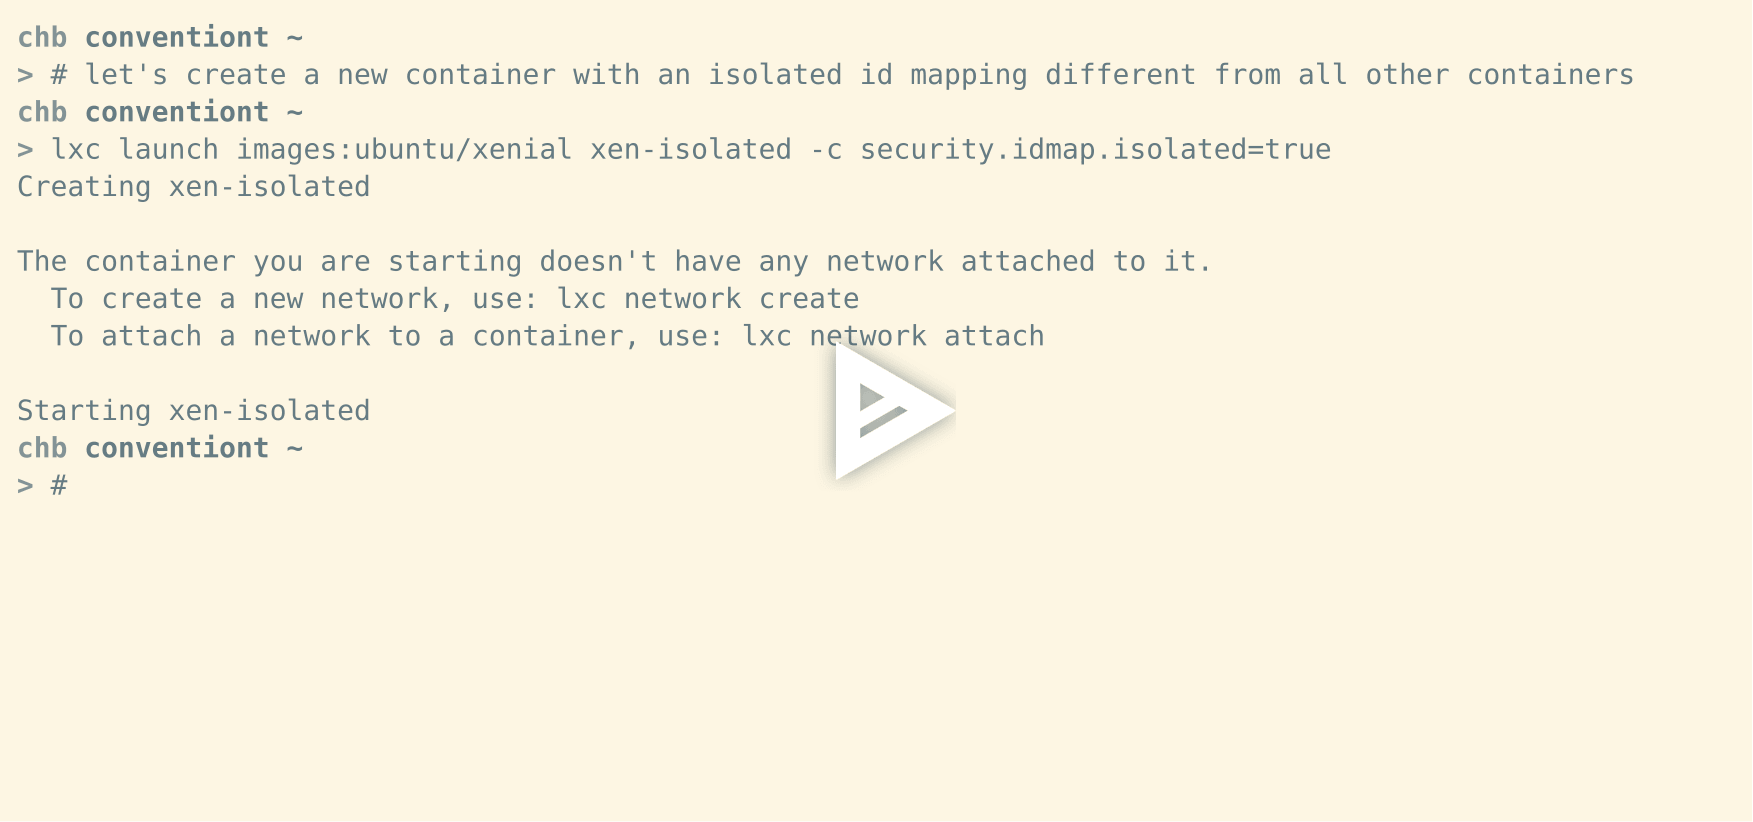
By default LXD will make an attached storage volume writable by the container it is attached to. This means it will change the ownership of the storage volume to the container’s id mapping. But Storage volumes can also be attached to multiple containers at the same time. This is great for sharing data among multiple containers. However, this comes with a few restrictions. In order for a storage volume to be attached to multiple containers they must all share the same id mapping. Let’s create an additional container xen-isolated that has an isolated id mapping. This means its id mapping will be unique in this LXD instance such that no other container does have the same id mapping. Attaching the same storage volume my-custom-volume to this container will now fail:

asciicast

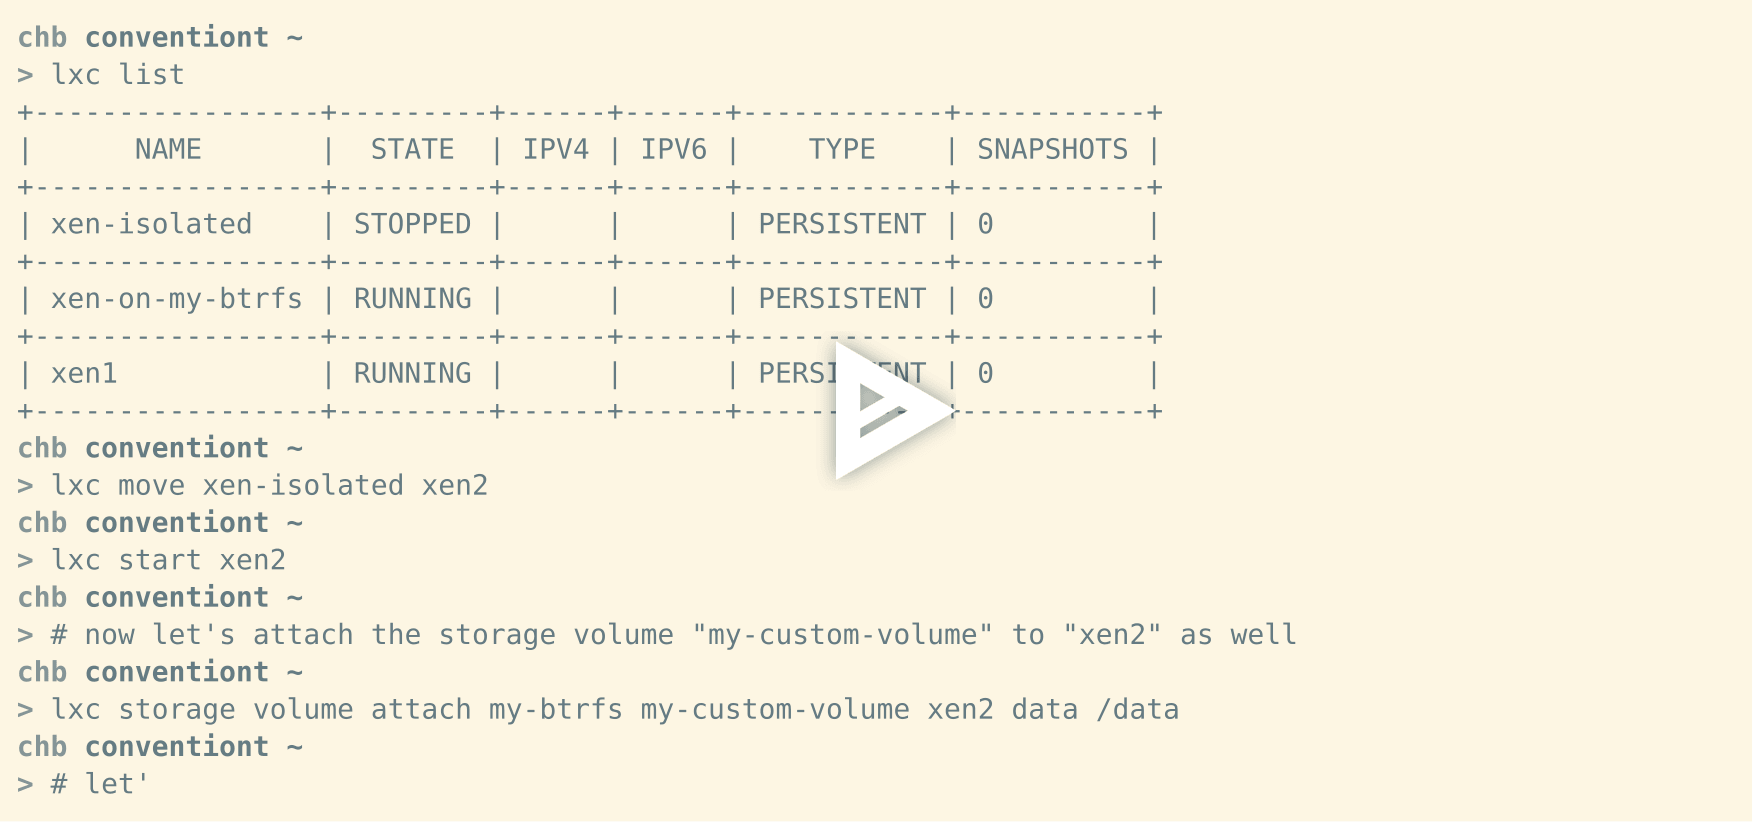
But let’s make xen-isolated have the same mapping as xen1 and let’s also rename it to xen2 to reflect that change. Now we can attach my-custom-volume to both xen1 and xen2 without a problem:

asciicast

Summary

The storage API is a very powerful addition to LXD. It provides a set of essential features that are helpful in dealing with a variety of problems when using containers at scale. This short introducion hopefully gave you an impression on what you can do with it. There will be more to come in the future.

Storage Tools

Having implemented or at least rewritten most storage backends in LXC as well as LXD has left me under the impression that most storage tools suck. Most advanced storage drivers provide a set of tools that allow userspace to administer storage without having to link against an external library. This is a huge advantage if one wants to keep the amount of external dependencies to a minimum. This is a policy to which LXC and LXD always try to adhere. One of the most crucial features such tools should provide is the ability to retrieve each property for each storage entity they allow to administer in a predictable and machine-readable way. As far as I can tell, only the ZFS and LVM tools allow one to do this. For example

zfs get -H -p -o "value" <key> <storage-entity>

will let you retrieve (nearly) all properties. The RBD and BTRFS tools lack this ability which makes them inconvenient to use at times.

lxc exec vs ssh

Recently, I’ve implemented several improvements for lxc exec. In case you didn’t know, lxc exec is LXD‘s client tool that uses the LXD client api to talk to the LXD daemon and execute any program the user might want. Here is a small example of what you can do with it:

asciicast

One of our main goals is to make lxc exec feel as similar to ssh as possible since this is the standard of running commands interactively or non-interactively remotely. Making lxc exec behave nicely was tricky.

1. Handling background tasks

A long-standing problem was certainly how to correctly handle background tasks. Here’s an asciinema illustration of the problem with a pre LXD 2.7 instance:

asciicast

What you can see there is that putting a task in the background will lead to lxc exec not being able to exit. A lot of sequences of commands can trigger this problem:

chb@conventiont|~
> lxc exec zest1 bash
root@zest1:~# yes &
y
y
y
.
.
.

Nothing would save you now. yes will simply write to stdout till the end of time as quickly as it can…
The root of the problem lies with stdout being kept open which is necessary to ensure that any data written by the process the user has started is actually read and sent back over the websocket connection we established.
As you can imagine this becomes a major annoyance when you e.g. run a shell session in which you want to run a process in the background and then quickly want to exit. Sorry, you are out of luck. Well, you were.
The first, and naive approach is obviously to simply close stdout as soon as you detect that the foreground program (e.g. the shell) has exited. Not quite as good as an idea as one might think… The problem becomes obvious when you then run quickly executing programs like:

lxc exec -- ls -al /usr/lib

where the lxc exec process (and the associated forkexec process (Don’t worry about it now. Just remember that Go + setns() are not on speaking terms…)) exits before all buffered data in stdout was read. In this case you will cause truncated output and no one wants that. After a few approaches to the problem that involved, disabling pty buffering (Wasn’t pretty I tell you that and also didn’t work predictably.) and other weird ideas I managed to solve this by employing a few poll() “tricks” (In some sense of the word “trick”.). Now you can finally run background tasks and cleanly exit. To wit:
asciicast

2. Reporting exit codes caused by signals

ssh is a wonderful tool. One thing however, I never really liked was the fact that when the command that was run by ssh received a signal ssh would always report -1 aka exit code 255. This is annoying when you’d like to have information about what signal caused the program to terminate. This is why I recently implemented the standard shell convention of reporting any signal-caused exits using the standard convention 128 + n where n is defined as the signal number that caused the executing program to exit. For example, on SIGKILL you would see 128 + SIGKILL = 137 (Calculating the exit codes for other deadly signals is left as an exercise to the reader.). So you can do:

chb@conventiont|~
> lxc exec zest1 sleep 100

Now, send SIGKILL to the executing program (Not to lxc exec itself, as SIGKILL is not forwardable.):

kill -KILL $(pidof sleep 100)

and finally retrieve the exit code for your program:

chb@conventiont|~
> echo $?
137

Voila. This obviously only works nicely when a) the exit code doesn’t breach the 8-bit wall-of-computing and b) when the executing program doesn’t use 137 to indicate success (Which would be… interesting(?).). Both arguments don’t seem too convincing to me. The former because most deadly signals should not breach the range. The latter because (i) that’s the users problem, (ii) these exit codes are actually reserved (I think.), (iii) you’d have the same problem running the program locally or otherwise.
The main advantage I see in this is the ability to report back fine-grained exit statuses for executing programs. Note, by no means can we report back all instances where the executing program was killed by a signal, e.g. when your program handles SIGTERM and exits cleanly there’s no easy way for LXD to detect this and report back that this program was killed by signal. You will simply receive success aka exit code 0.

3. Forwarding signals

This is probably the least interesting (or maybe it isn’t, no idea) but I found it quite useful. As you saw in the SIGKILL case before, I was explicit in pointing out that one must send SIGKILL to the executing program not to the lxc exec command itself. This is due to the fact that SIGKILL cannot be handled in a program. The only thing the program can do is die… like right now… this instance… sofort… (You get the idea…). But a lot of other signals SIGTERM, SIGHUP, and of course SIGUSR1 and SIGUSR2 can be handled. So when you send signals that can be handled to lxc exec instead of the executing program, newer versions of LXD will forward the signal to the executing process. This is pretty convenient in scripts and so on.

In any case, I hope you found this little lxc exec post/rant useful. Enjoy LXD it’s a crazy beautiful beast to play with. Give it a try online https://linuxcontainers.org/lxd/try-it/ and for all you developers out there: Checkout https://github.com/lxc/lxd and send us patches. 🙂 We don’t require any CLA to be signed, we simply follow the kernel style of requiring a Signed-off-by line. 🙂

Zunge am Boden

Er konnte in der Stadt stehen und die Hände an der sauber gehaltenen und eitel ausgewählten Kleidung reiben und doch das Gefühl von anhaftendem Schmutz haben. Dieser Eindruck nährte sich verschwommen aus einem ihm anhängenden Bild: seine Zunge über dem Boden dicke Bluttropfen verlierend und er war um des Überlebens willen gezwungen ihnen hinterherzulecken. Und nicht einmal der Dreck war es, der ihm zu schaffen machte, sondern das absonderliche und rothölzerne Kratzen der Zunge an dunklem, rauen und abgewetzten Asphalt großstädtischer Bürgersteige. Und wenn er mit den Händen an den weichen Hosenbeinen entlangfahrend in der Straße stehend diesen Gedanken fasste, dann zuckte er merklich zusammen. Manchmal konnte er nicht von dem Gedanken lassen und er wusste, wenn er zu lange wartete, würde er von weiteren, unkontrollierbaren Wahrnehmungen befleckt werden und sich an ihnen erfreuen. So überkam ihn das Geräusch der über den Boden kratzenden Zunge. Es war als legte er sein Ohr vorsichtig, den Kopf langsam absenkend, einem schabenden Geräusch entgegen, dessen gutturale Farbe weißlich schimmernden Ekel hervorrief. Er ging weiter. Nach einer Weile konnte er fühlen wie die starren Wege unter seinen Füßen aufweichten, bis schließlich der Boden brach und ihn in vages Dunkel zu ziehen schien. Als er merkte, dass er sich in diesen Gedankenspielen verlor, erhob er seinen Kopf, rieb die Hände erneut an seinen Hosenbeinen und achtete auf das unangenehme lauwarme Geräusch, das dadurch entstand.
Es erinnerte ihn an die modrige Struktur der Gebäude und das wässrige Auge dieser ganzen Stadt. Sie schien wie ein Zyklop auf ihn herabzustarren. Seine Augen hingegen waren taub und degeneriert. Vielleicht konnte er deshalb nicht sehen, dass die Wände auf ihn herab schrien, sondern konnte die rissigen und faltigen Verbeugungen des herabbröckelnden Putzes nur schmecken.